Traditional Hair Section 2 - The First Layer

Step 1: Take your marking pen and draw a line down the center of the doll's head - starting at the top of the forehead (where the hair will start) and finishing at the back of the crown.
Step 2: Draw a line around where you want the hairline, gently slope your line towards the "ears" and follow around the back of the neck, mirroring as best as you can on the other side. There is no right or wrong here, place this line wherever you think is best.
Step 3: Draw a third line from "ear" to "ear" (sorry about the blurry pic!). I'm drawing my line a little high in the pic out of preference. You can place your line wherever you like!
 Step 4: Pin your first layer of hair into place along the center part. You can also use safety pins.
Step 5: Thread your dollmaker's needle with a long double strand of thread (at least 2 feet), tying a strong knot at the end. Bring your needle through the front of the forehead and sew the layer on with 1" long backstitch basting stitches. Sew until you get to the end of your line on the crown. If there is extra hair on your machine-sewn layer, cut the thread - you may need to use the hair later!

Step 6: You are going to start the same way with the "ear to ear" line. This time, stop sewing when you get to the back, underneath the center part. Tying the thread off and starting on the other side of the head.
Step 7: To have a complete layer, you will want to meet in the back as evenly and as neatly as possible. You will also want to make sure there is enough hair to cover the back of the skull for the third line. This is a good place to add additional hair if necessary to cover all of the skin of the head.

Step 8: You will repeat steps 6-7. The only difference is that instead of using large basting backstitches, you will want to make your stitches much smaller. You want these stitches to be extra secure, for they will be openly exposed to your child's hands. Also, secure your thread every 5-10 stitches by sewing in place a few times. Only sew down about 2-3 strands of yarn at a time. You will start sewing this line approximately 3" beneath your "ear to ear" line and follow around the nape of the neck.

Step 8: When your two sides meet on the back of the neck, combine, adding yarn if needed, to make sure that all of the skin on the head is covered, especially between the 2nd and 3rd line. If there is some head exposed between the 1st and second, no worries, it will get covered up by the next layer.
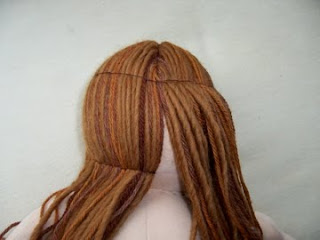
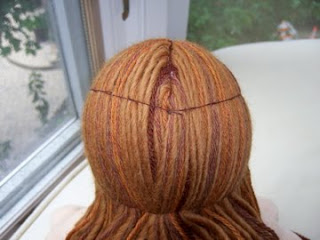
Step 9: when you are finished, your doll should look something like the final two pictures. Don't worry if it isn't super-neat, it will be covered up by other hair, and your doll forgives you. Time to move on to the next section (which is way easier)!


